I am going to try to document as well as I can the construction of our parking palapa. It's basically a traditional construction method, using native materials, but in this case, quite well engineered and fastened completely with threaded rod, nuts and washers, and lag screws.
We were extremely fortunate to get the services of Mr. Florencio Rodriguez, arguably the premier builder of palapa structures in this part of Belize, if not the whole country. He built (and repaired after Hurricane Dean) the extremely impressive roof structure of Jim and Melanie's Trinity House on Gringo Lane.
The best comparison is right at their house - Florencio built their palapa roof, which withstood Dean with minimal damage of a few lost pieces of thatch, whereas, the palapa roof of Greg and Connie, right next door, wasn't built by Florencio. It collapsed and after Dean was converted into a burn pile. I guess that about sums up his expertise and provides the best recommendation of his skill and art.
And he really does look at it as art. He tries to do something a little different and unique in each palapa he builds. From the selection of interesting wood shapes and types, to differing geometries of the structure, etc., he tries to create interest in each structure.
This is how palapa's should be built.
It starts off yesterday morning, shortly after 6:00 AM when Florencio and his crew arrive. They get to it right away. We had marked out the location for the columns the previous day, so they were able to start digging right away.
As soon as the holes are dug, "Thunk"! In go the very heavy colums.
 |
| Digging the Holes |
 |
| Preparing for the lift of the Column |
This next photo shows the crew hoisting the column to slide it into the hole. It really reminds me of the flag raising on Mount Suribachi, on Iwo Jima during WWII. One of those things you don't notice at the time. It only leaps out at you as you're editing the photos afterwords.
 |
| Getting It Up |
Of course, after the columns are raised, they tamp in sand to stabilize them. Florencio doesn't like to use concrete to encase the columns, because it doesn't let water run away from the wood. It traps it and only causes the wood to rot. It's such a dense, heavy wood that as long as water can get away through the sand, a column should last 35-40 years. I really don't think I'll care much if it rots out after that time.
 |
| Tamping Sand Around the Column |
 |
| Columns Growing Before Our Eyes |
Once the columns are all upright, they're trued up and trimmed to the proper height. Then each is notched to receive the longitudinal beam.
 |
| Getting the Columns to 8 Feet High |
 |
| Florencio Cutting the Beam Notches |
If a longitudinal beam isn't long enough (as was the case with one of our two) then Florencio notches the two pieces and they're joined by a series of threaded rods, washers and nuts before they're raised into position.
 |
| Notching A Beam For Joining |
 |
| Raising A Longitudinal Beam |
Once the beam is up in position, then it's tied off and drilled so that threaded rod can be fed through it and each column. Then as cross beams are added to the mix, they're trimmed after being bolted into place.
 |
| Tying Off Beams For Drilling |
 |
| Trimming Cross Beams |
It's beginning to look like a structure. Cross beams all get placed, then the rafters are placed. These are also bolted - at each apex and to the beams, then they're joined by a ridge pole which is also bolted into place.
 |
| Cross Beams Going Up |
 |
| Roof Taking Shape |
 |
| Rafters and Ridge Pole in Place - End of Day One |
During the day, Florencio, took a couple of hits on his big toe, which he had previously injured. He was in quite a bit of pain. Dianna took over and doctored him with some antibiotic ointment and Ibuprofen. Later, he went to the hospital and got some pills to help with infection and swelling.
 |
| Good Job, Dr. Dianna |
Just so we keep everything in perspective, some folks just don't get too excited about all the hub-bub going on around them.
 |
| Midas Not Overreacting |
 |
| Blue and Dianna Sharing Nap Time |
Even though she likes to supervise everything going on, even Cindy needs some down time. Here she's resting in her favorite perch. The railing was tailor-made to just the right height for her to rest her chin on it and still be able to keep an eye on all that is going on.
 |
| Cindy At Her Favorite Spot |
Cody, even though he's recovering from a pretty severe cold, managed to put in a heavy day's work as well. he finished up one soak away for the roof gutters to come and started another. He also filled in the trenches for the water/electrical line additions out to the palapa.
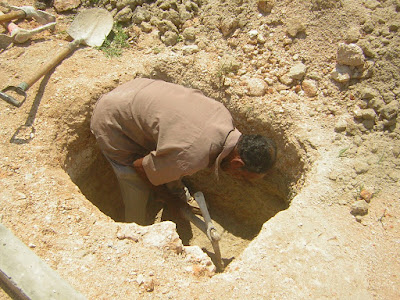 |
| Cody Digging to China |
 |
| Adding a Bit to the Trench to the Palapa |
The third project going on at the same time (three-ring circus anyone?) is the finishing of the "basement". Installing the metal studs to separate Dianna's and My workshops, and to provide definition for the store room.
 |
| Putting Up the Metal Stud Work |
 |
| More Metal Studs |
During the course of the work, the guys put a skim-coat of mortar on the floor of the store room, just off the utility room. Shortly after that, Cindy trotted right through the middle of it, leaving nice, great big prints right through it. After that, I chained her up outside to prevent a recurrence. Of course, shortly after that, guess who tromped through themselves? I managed to avoid being chained up myself - I'm sure the workers would have like to have chained me up too for that. Mea culpa - I thought it was firmed up enough to tread on safely.
 |
| Footprints in the Sand |
Sometimes, even the project manager has to get down and get dirty. So I did. Here's a couple of shots Dianna took of me connecting the new water line to the existing water main. That pipe in the air is the drain from the washing machine. Wasn't much other way to do it. It's a minimal traffic area anyway.


