Pages

Showing posts with label Mosaic. Show all posts

01 May, 2009

Out of Storage And In the Light - Finally

But, first this word...

I mentioned a couple of days ago about Cody oiling our deck. He did a really nice job of it. I just thought I'd include a shot of the result. It's had some time now to soak in nicely. As you can see from the photo, it has absolutely brought the wood back to life. The color is deeper, the grain sharper, in short, it's gorgeous.

The one downside to it is that the deck is decidedly warmer (as in hot) now, when you walk across it in bare, dry feet. It's tolerably comfortable when you've been in the pool and walk on it with wet feet.

What a difference it has made. The gray weathered look is totally gone.
The Beautiful Deck
And, also leading up to the mosaic installation, Cody also finished painting the pump house. He painted blue trim, which matches the decorative block and wood railings of the house. Then he painted the walls with the same terracotta as was used on the house. A bit darker than what was used on the fence.
Cody Painting Trim on the Pump House
Cody Painting the Walls of the Pump House
Now, to the business at hand. Here's the whole process - well, as far as we got it done today, anyway.

First off, this morning I had to retrieve the mosaic from my workshop, which has become a storeroom once again. Anyway, I fished it out and then spent a few minutes prying grout out from the screw heads, which had been applied to hold two 2x4s that acted as backing for the mosaic. Turns out, they didn't really work all that well, as the PlyCem (cement board) had warped slightly into a sort of bowl-shape, which meant that when we stuck it to the wall of the pump house, that we'd have to use a few more screws to straighten it out and get it to adhere correctly.
Mosaic in Storage
After that, I loaded it onto my hand-truck and hauled it out to the guest house, with Dianna's assistance as the mosaic weighs in the neighborhood of 50 to 60 pounds.

The guest house became my impromptu workshop. Here you can see it laid out on a folding table ready for me to work on it. I had to trim about 2 inches off the top and bottom with my saber-saw in order to get it to fit just under the waterfall. It's lucky the mosaic wasn't any wider. I would have had to trim that as well if there had been about another quarter of an inch to its width.
Mosaic Ready for Trimming
I had to run into town to get screws and anchors to help support the mosaic. No easy task, I thought, since today is Labor Day here in Belize. Everyone is off work. As luck would have it, I happened to call Doug and mentioned I screwed up by not getting sufficient supplies beforehand. He told me Villa's Supply was open this morning. What a break. I jumped into the Isuzu and headed into town.

There, I explained to the young man what I wanted to do and what I thought it was that I needed. He said, "why don't you use "blue screws? You won't need anchors with them. So, he sold me a bunch of them, along with a bit, one size smaller than the screws.

As I headed back, I saw Doug at his house, just after I turned onto our road. I told him what I'd bought, and he said, that it was cool. He'd used them a bunch of times and that they worked great. I'd never used them before, so that was good to hear.

I told him I'd be ready to do the mosaic as soon as I got home. He arrived about 10 minutes later on his bike, and we got to work.

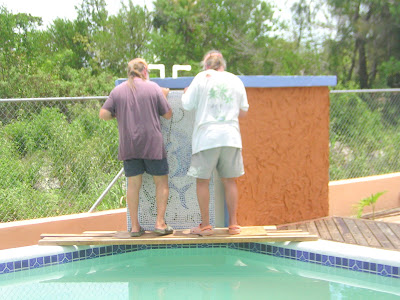
First, since the mosaic is so heavy, we decided to position a piece of wood at the bottom, as a rest for the weight of the mosaic. Here you can see we're fastening it (with more blue screws, courtesy of Doug). I damned near ruined my Craftsman 18V drill, concentrating on drilling and not on where the water was.
Applying the Wood Brace For the Mosaic To Rest On
Figuring Out How to do It
Having done that, we were ready to "glop" on the adhesive - a waterproof (or at least water-resistant) tile setting adhesive. Here, we're using a scrap piece of plywood as a mortarboard.
Skilled Craftsmen At Work
And, right away we begin troweling it on. According to the bucket, we had about a 20-minute work window for the stuff. Of course, that's figured on working in mainland US of A, not Belize. So, maybe we had somewhere between 10 and 15 minutes.
Troweling The Adhesive on Nice and Thick
Just Go Ahead and Glop it On
A study in concentration, we both worked fast and sure. Actually it was quite a large area to cover - about 2'10" by 4'6", all in one shot.

The Mark of a Pro - Pencil Behind the Ear
Merrily We Trowel Away
Then, we brought out the mosaic - carefully, I might add. Making sure we had it right side up, we were ready to apply it to the wall.
Somewhat Nerve-wracking Work
Getting It Into Position
In Position and Stable
Doug Uses a Couple Small Wood Bits For a Better Fit
Doug Adjusting the Mosaic
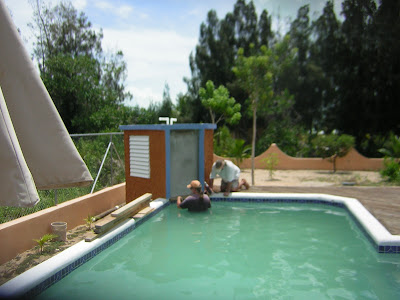
As soon as we were happy with the positioning of the mosaic, I started drilling holes and running in the blue screws, which really did a great job of drawing the mosaic in against the adhesive. We used eight screws altogether. Probably more than we needed, but it did give us a nice comfortable feeling.

Applying the Blue Screws to the Mosaic
Finishing the Blue Screws
And, finally, here's the end result of our labor. It really looks cool and finishes off the pump house nicely.

The Mosaic In Place
The Mosaic Looking Good
Of course, I still have to add grout around the edges, ensuring a smooth transition to the waterfall lip itself. And not to forget, covering the screw heads in the mosaic with grout and then applying glass stones over that in the appropriate places.

When it has the afternoon sun shining on it and the waterfall running, it is just going to be absolutely sparkly. We couldn't be happier.

Just a reminder, that the mosaic is a piece that we commissioned Gale Peterson and Ali Shandiz to do for us. Their website (http://cpsnetworki.com/Homepage.htm) has quite a bit of the art and projects they are involved in. I also follow their blog, Virtual Existence Time Machine (http://iguanamountain.blogspot.com/), which is listed on the right-hand column of this blog.

Thanks, guys. As you can see, we've finally gotten it installed. I know you thought it was doomed to spend eternity in darkness, but now it's out in the light and we love it!

24 April, 2009

The Water is Falling, The Water is Falling...

I just love it when a project comes together. This one came together almost flawlessly.

In the previous posting (http://winjama.blogspot.com/), you could see the notch Cody and I were cutting into the pool-side wall of the pump house. This was to house the new waterfall unit I had ordered from the States.

The unit itself was two-feet across, with a six-inch lip and a three-inch plenum box, both running across the whole width. the six-inch lip is where the water comes out as a nice sheet, making a really cool waterfall.
Cody, Using the Air Chisel
We started off making a 1-1/2" by 25" notch at the very top of the wall. We assumed that 4" blocks had been used all around the walls of the pump house. Wrong. On the pool side, 6" blocks were used, but we didn't find that out till we had finished the notch and stuck the waterfall unit in to trial fit it.

There was a short-fall of about two inches. Of course, this meant that we were going to have to cut a larger notch in the back to accommodate the box portion of the waterfall. And was probably a good thing, as that notch, forming a shelf, would help support the waterfall unit itself.

After finishing the notch - front and back, we trial-fit the unit again and got Dianna's concurrence that it was centered and level. I had purchased a small bucket of hydraulic cement (sets in 2-3 minutes and is designed to cure under water. I didn't want to buy a whole back of cement. Most of it would have gone to waste.

As you can see below, we slathered it in the back, as we had done the front of the unit. Neatness didn't really count. With a 2-3 minute set time, your working time is even less - about a minute to a minute and a half at best. We didn't fully encase the backside just in case we ever have to remove the waterfall unit, it will be relatively easy to chip the concrete away, cut a pipe and slide the unit out.

The Waterfall From the Backside
Closeup of The Waterfall
The hangy-down thingy is a rock and debris trap, so that any incoming crud will get trapped before going into and blocking part of the waterfall outlet. The outlet is extremely critical to obtaining a smooth sheeting waterfall. The slightest piece of material will disrupt the smooth flow and will be immediately noticeable.

As you can see below, it looks pretty cool.
The Waterfall in Action
Here's a closeup of the waterfall. The only part of the whole thing that remains is an approximately 1/2"x24" reveal. It barely sticks out 1/8" from the wall.
Waterfall Closeup
I was apprehensive when it came time to turn on the pump. I don't think Cody really knew what to expect. It wouldn't be the first project that blew up at the start... Not that I do bad work, it's just that sometimes, sh** happens. Anyway, when the pump was turned on, there was no need to doubt our handy work. It functioned exactly as advertised with nary a leak.
Couple of  Happy Campers
Just so you know, I'm not shirking my other duties. On the walk this morning, Cindy carried the mail (one letter) and 4 lbs of bones from the market. Secret also carried 4 lbs of bones and in addition, carried some onions, okra, romaine lettuce, cilantro, and green sweet peppers.

Just in case you were wondering about costs of things, bones for the doggies, knuckle bones chopped into quarters and bagged in four separate bags (so each dog has a load to carry and that their packs are balanced) cost $1.00 BZ per pound, or $8 BZ total. The veggies came to $8.00 BZ total for 2-onions, 2-peppers, 5-okra things, a bunch of cilantro, and a head of romaine lettuce. Secret carried all the veggies.

Along the way back from town, I stopped and shot the Corozal Resort sign again. This time it had landscaping done, making it look quite professional. They're also adding an almost 25' planter box behind the sign.
Corozal Bay Sign Landscaping
What happens next at our place? Well, so there's little danger of paint being spilled on the mosaic, painting of the pump house will take place next. After that, I'll install the mosaic. Barring the unforeseen, it should go quite quickly. I'm looking forward to seeing that whole project jus

21 April, 2009

Another Project In the Offing

Here we go again. The waterfall project is underway. I've got the outline of the notch to be cut out in the wall drawn and I've drilled a bunch of little holes to help with the process. I'm going over to Jim's after lunch to borrow his angle grinder and compressor. Once I have that, then the notch should be done post-haste (I hope).
Centerline and Notch Drilled
The second part of this project will be mounting the mosaic that Gale and Ali did for us. I have hopes that that will go easily as well.
Showing Platform and Where Mosaic Will Go
And, I guess the third part of that will be re-mounting the waterfall switch over on the wall of the guest house near the spa. We'll also be adding (later on, of course) another switch (next to the waterfall switch) and a separate pump motor to power the spa outlets. Once we get all that done, the pool and waterfall should be way easier and more convenient to use.

Here's Jim's compressor. His angle grinder used one of those little 4" wheels. Of the four hardware stores I went to in town, exactly none had a concrete cutting wheel. Most of them (well, 3 out of 4 anyway) had concrete grinding wheels but that wouldn't do what I needed to do.
Jim's Compressor
What Jim did have that saved the day, was an air chisel. Once I figured out how to keep it from leaking air, it worked slowly, but quite accurately - which was just perfect for today's project. I did have to use a couple of manual chisels and a 2.5 lb. sledge.

Here I am hard at work with the air chisel. Dusty work. I eventually put on a particle mask - for all the good those do with a beard.
Concentrating and Chiseling
And here's the notch on the waterfall face, cut through the front of the wall blocks. Just have to get the concrete from the roof pour out of the way now. That's hard stuff.
Outside Notch
I'm in the zone with the air chisel. It wasn't till after I started using the manual chisels and the sledge, that I realized my arms were giving out (Hmmm, I can still operate a keyboard... what does that tell you?).
Still Concentrating
Every good project has a good supervisor. Here's Secret on the job, keeping a sharp eye on everything, and making sure that we do a good job.
Secret Supervising
I finally decided to go inside and start tackling the notch from there. Here's the first cut at it. It's about here that I realized my arms had turned to Jello and at this same place, I let Cody take over for me.
Inside Notch
The two pipes you see above, the left is for the waterfall, the right is for the solar heater. After we get the notch cut, I'll remove them. It'll be easier to cut them accurately then.

Here is where Cody took over for me. He's already cut through on the right side, so hopefully, it shouldn't take too long to get done.

Cody Running the Air Chisel
It's a good thing Cody took over when he did. My arms feel like cooked spaghetti. Swinging a sledge is hard on an old fart's body - at least his arms. Cody started off with the air chisel right after lunch and made good progress. But, there was quite a bit of concrete from the roof pour that had slipped down in the holes of the blocks and it was quite hard. He ended up using the large 1" chisel and really laying into it with the sledge to break it free. He's about 2/3's done with the hole. Tomorrow morning, he thinks he'll finish it up.

I'll be heading into Lano's Supply tomorrow to get some PVC pipe and fittings so that we can hook up the waterfall and maybe even test it out, who knows. If things go as expected, we'll be able to do that. I'll return Jim's compressor and tools then too. Would be nice to have a compressor that same size... I'll add it to my Christmas wish list.

Even with Cody whacking away at the hole, Dianna and I took some time to jump into the pool and cool down. We probably should have felt guilty. We did a bit, but I can live with it.

So, if we get the waterfall in and working correctly tomorrow, Friday, I'll work on getting it plastered into place, caulked, etc., and then we'll start on fastening the mosaic.

Gale and Ali stopped by the day before yesterday with the adhesive, white cement and spare marble bits so now we'll be able to get that installed and fixed up. Hopefully, that will go fast as well. Then, the only thing is to have Cody finish painting the pump house, and we'll be draining and scrubbing the pool. Doug and Twyla have already volunteered to help with the scrubbing. (What good friends).What we want to do, is drain, scrub and fill the pool all in the same day, to minimize chances of cracking or it moving up (floating) because of the water table. If we do things right, it shouldn't be much of an issue.

So, there'll be a few more photos as this all progresses. I'll get them posted as soon as possible so you can follow along and see how it develops. Hopefully, no surprises.

Cheers,
Dave

05 April, 2009

Sunday Grab Bag

On the morning walk today down by the fisherman's pier, we had the pleasure of watching frigate birds exhibiting some of their mating ritual. Well, really all we saw was the male puffing out his throat sack and making sort of a clicking noise. Apparently that was all very interesting to a female frigate bird, as she was close by the whole time.
Male Frigate Bird Showing Throat Sack
Here's the male and female flying close together. They're easy to photograph because they stay almost motionless in the air. Just wish I'd had my good camera along.
A Mating Pair?
After the walk, I turned our girls, Cindy and Secret, loose to sleep the day away.

After breakfast, I opened up a few of the boxes we got from our shipper (Roy and Son, Ltd. Roy Pescascio). Below is two of our three fans we purchased over the Internet for our guest house. They'll be stored till we're ready for installation.
Two of Three Ceiling Fans
The other two things that we got was our new waterfall for the pool. It's a plastic contraption that will fit right up next to the pool house roof and should give us a nice even sheet fall into the pool.
Plastic Waterfall
Along with the waterfall came a debris trap that is supposed to be inserted right before the waterfall unit, as any sizable debris at all will be enough to disrupt the smooth sheet of the fall. It's probably designed more for use in a pond, but, we'll insert it anyway - just in case.
Debris Trap
Here's a couple of pictures I shot that show more or less where the new waterfall will go. The two pipes going to the ceiling will be re-routed. One controls the existing home-built waterfall (that never worked all that well) and the other controls the solar heater on the roof (yet to be installed).
Waterfall and Heater Controls
Here's where the waterfall will be placed. There's a thin-lined box up near the roof showing about where the snout of the waterfall will poke through. Right below it will be the dolphin mosaic.
Waterfall Location
Dolphin Mosaic
So, my next project could be one of two things. One - installing the waterfall and mosaic. Which also entails draining and cleaning the pool, and Two - installing the wifi external antenna, to extend the Internet to our guest house and possibly another location or two around the area.

I know Craig would like us to do that first. But, the pool is a powerful tool that is really useful during this hot weather. I would really like to get that underway and done first. On the other hand, the antenna would probably go fast. Ahhh, decisions, decisions, decisions... I didn't retire to have to make decisions.

Perhaps I'll have a beer or two and a swim and think about it.

19 December, 2008

Guess What's Started?

I admit it. I did take a brief hiatus for a few days. I'd like to say it was due to some sort of equipment malfunction or something, but no. It was mainly due to laziness on my part. My apologies to everyone.

Here's what's been going on. We've started making great use of Skype, as evidenced by the photo of Dianna below talking to her brother, David.
Dianna Talking to Her Computer
Since we're on Satellite, we can use Skype. If we were still on BTL, well, that's something that they block. I've heard they block it illegally, but still it's blocked.

Skype works pretty good. It's not perfect by any means, but when you think of the distance and nearly instantaneous comms, well, it's really better than pretty good.

I've finally started shooting more stuff with my DSLR (a Canon). A couple of days ago, I fired up my telephoto lens and snapped this great egret roosting in the pine trees across the canal from our place. If you look carefully, there's someone else in the picture also checking out the crane.
Two Visitors
Long-time readers will remember Cody's (our caretaker) silver and red Chevy van. Well, he finally sold it (for more than he paid for it too). He took that money and now is the proud owner of this nice little red Nissan. BTW, the stereo works fine - sounds like a jukebox on wheels as he comes down the road.
Cody's New Ride
Now to the news... Construction has started again. Our guest house is finally underway. Here's a couple of shots showing the logistical end of things, the staging of the materials. Loads of sand and gravel, and about 700 6" blocks, and under the palapa, 35 bags of cement. Oh yes, and a bunch of lengths of rebar.
Getting Ready for the Job
Getting Ready for the Job - Part II
And here we are with construction underway. You can see it's going to be about 23'x23' and will but up right against the pool deck. A nice location.
Forming the Footprint
More Forming the Footprint
Isidoro and his brothers are doing the construction, working for Bob who's the GC. Footing pour is well underway in these shots.
Guest House Footings Being Poured
More of the Guest House Footings Being Poured
More of the Pour
And More of the Pour
Esidoro Adjusting the Bridge
We have a new "pool boy" - Cody. We enlisted (ok, press-ganged) him to clean tiles in the pool. Here he and Dianna are hard at it. I know, it's pretty rough duty. Notice the liquid refreshment...
Dianna and Cody Cleaning the Pool Tile
Still Cleaning the Pool Tile
Quackers is Keeping an Eye on Things
Cody Hard At It
We had been thinking of having a mural painted on the pool house where the waterfall comes into the pool. We met with Gale Peterson and Ali Shandiz and they suggested doing a mosaic. Here's a design they've proposed for us. It's based on a Roman spa mosaic and looks pretty cool. It will definitely be a great addition to our pool. They have a website too: (http://cpsnetworki.com) showing off their artwork and projects they have done.
Proposed Mosaic for Our Pool
Last but not least, just to show that we have done some things in the interim, I've been working some to neatify the pump house. I've added a bracket (actually a planter box support frame) to hold up the vacuum hose.
Pump House Beautification