Pages

Showing posts with label Drain Trench. Show all posts

03 October, 2008

TGIF

It's hard to be real excited about Fridays when every day is Saturday... Well, at least for us it is.

Today began as usual - dog walking at 6:00 AM, John and the workers arriving at 6:30 AM. They don't start the day drinking coffee and shooting the bull about the past evening. Not these guys - they get right to it, cracking on with the pool. John sets a good example.

That's why there's been such good progress so far.

We did have some rain yesterday that brought work to a halt a bit early. No such problems today. Below is a shot of the pool, all covered up, from our front (canalside) pool, showing the tarps covering the fresh DiamondBright.
Tarps Over the Walls
Now, we move progressively in so you can see the tarps over the latest work.
Closer and Closer
Much Closer
Ah, this is more like it. Sunshine is beginning to take over for the day. The tarps have been removed and work is underway.
Last of the Tarps Removed
Mariano Mixing DiamondBright
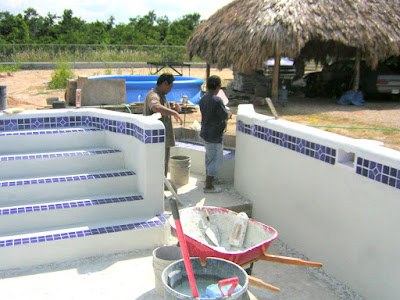
Finishing the top cap of the pool is the logical place to start. Then they work progressively down to the floor.
Emir Applying DiamondBright
Manuel Cleaning Tiles
Here's another view of the pool, looking toward the east. This wall is just about finished, and man, does it look good.
Mariano and Manuel Working on the Wall
This One's Done
Lumber for the deck has begun arriving. This wood is for bracing the deck. It'll run along the pool edge as well as along a wall, yet to be built.
John and Agusto Talking Lumber
John Showing Manuel How to Apply Wood to the Pool Wall
Now, it's really starting to look like a pool. Here's Mariano finishing the top edge right up to the spa area. This is the one area of the pool remaining unfinished until we get the jets and controls shipped in from California and Florida. California from the manufacturer who sends the items to the pool supply company in Florida, who will in turn, ship them via US Post Office, to us here in Belize.

It seems convoluted... and it is. But here's why. After days of searching online, I finally found a pool supplier (Inyo Pool Supply, http://inyopools.com) who will ship out of the country. I ordered the jets, fittings, and controls from them. They in turn, had to contact Waterways (http://www.waterwayplastics.com/main.html), the manufacturer, in California. Waterways doesn't deal directly with consumers, so that's why everything had to be shipped back to Inyo. Once Inyo receives the stuff, they'll send it via USPS to us.

I had checked on prices to have FedEx send it. Try $450 US, vs. $125 US with the Postal Service. We need it soon, but not that soon!
Mariano Finishing the Top Edge
Dianna Supervising the Step Work
Not being one to waste time, John checks fitting lumber to the pool sides to support the deck.
John Checking Fitting of Deck Bracings While Emir and Manuel Work Tile
Diamond Briteing the spa seating area
Here it's just about completed. Some cleanup, and if it doesn't rain tonight, in the morning, the guys will be Diamond Briteing the floor with 8 to 10 bags of it just for the floor.
Pool Getting Very White
If you click on the below picture and look close, you can see some yellow nylon line strung alongside the pool - actually, going over the rubble pile. This marks the boundaries of the deck area. So, it will be a very generous-sized deck.
Yellow Line Marks the Boundary
Here's a shot showing Mariano's skill with the trowel on the pump house, and the wheelbarrow width we left between it and the fence.

Now, I have to say, regarding the rough finish. To Belizeans, it's a sign of poor workmanship - everything should be smooth. Boring. It's taken some time to teach them to apply it rough. We like it, they don't. I'm still trying to find a book or catalog or something that shows examples of the many different standard textures used up north to show them what can be done.
Rough Texture and Wheelbarrow Width
Here's Agusto digging small trenches for the pool overflow (foreground) and filter backwash (rear trench).
Taking Care of Trenching
And lastly, heres a couple of shots of our hard working girls. They do work hard. Good watchdogs all night long, then I make them go for a brisk three-mile walk into town and back at 6:00 AM every morning that it doesn't rain. They manage to sleep most of the day since the walk pretty well does them in for a few hours. Even then, during the day, they still keep tabs on who comes by the place and even into the property. They know they have a job to do and do it very well.
Cindy and Secret On Guard
Cindy Hiding Among the Flowers

07 June, 2008

End of the Work Week

The last projects for the week involved laying about 180 feet of 3" drain pipe and connecting three floor drains to it to pull rain water from the yard and driveway back to the canal where it empties.

I really was surprised that this was completely done in two days. Just digging the trench was a huge task. Laying the pipe, of course, went much faster, but still, I didn't expect to get it done yesterday.
Laying 20' Pipe Sections
This pipe goes all the way back, under the wall and empties into the canal.
That's A Long Stretch
I had the guys install three 4" floor drains, one in each of the soak-aways Cody built to handle run-off from the gutters, and one (below) that will drain a trouble spot in the driveway itself.

With the drains at each of the soak-aways, the guys connected the pipes from the gutters directly into the long drain pipe. If all works as planned, we should have much less of a rain water puddling problem than before.
Digging Under the Curb for Driveway Drain
While Isaiel was here installing the burglar bar windows and doors downstairs, Dianna took advantage of his having his arc-welder handy by having him tack some of the iron pieces that were loose on some of the old ornamental iron pieces she is going to use as trellises at various spots in the garden.
Dianna's Trellises
A trouble spot in the driveway was under the palapa. It prevented rain from landing on the ground under the palapa, but didn't stop it flowing in from all around, and leaving the stickiest layer of muck under the palapa. Well, that's solved now with 4" of gravel. It'll tie into the driveway really well with one more load of gravel yet to be ordered.
Mucky No More
It's amazing just how much the gravel in the driveway changes everything - really gives a finished look to the whole place, and... No more mud!
Now I Have to Wash the Isuzu

05 June, 2008

Breaking Stories

This just in...

You can see some pictures of the flooding down in southern Belize at (http://www.nemo.org.bz/nemonews/news_releases/article_335.php) courtesy of the Belize National Emergency Management Office (NEMO). What a cool acronym.
-------------------------------------------------------
Now that we're done with the heavy rain for a couple of days or so, it's time to get back to work.

Y'know, it seems that Thursdays are our crazy day around here. Yesterday was no exception. We had Elsie here, Florencio and his crew building her parking palapa (about 1/2 the size of ours), Cody as usual, three guys he brought in for me to help him dig the long trench, and Isaiel and his helpers doing the burglar bars and doors downstairs.

Of course, today, Friday, seems to be about the same as Thursday. All the guys I mentioned above are here today too.

After today, when Isaiel and his guys finish the burglar bars, we'll finally be able to unload the truck. That'll seem like Christmas, I'm sure. Then we'll be able to sell the truck and it won't be hanging around anymore.
Burglar Bar Doors and Windows Are Going In Downstairs
We also took advantage of a break in the weather to have a couple loads (10-15 cubic yards each) of gravel brought in. So far, Cody has gotten the first load spread. it really looks good and gets rid of mud. Yeah!!!
A New Bed of Gravel Really Helps
A New Bed of Gravel Really Looks Good Too
We're also working on a bit more curbing to help corral the gravel. Here you can see a new planter bed right beside the palapa to help direct traffic to the palapa.
Curbing Going In
2nd Load of Gravel Yet to be Spread
Even though the two soak-aways Cody put in seemed like a good idea, with the heavy rain earlier and the run-off from Elsie's lot (hers is higher than ours), they just proved inadequate. So, as a result, I decided we needed to install 3" drain pipe to the canal, to take the rainwater from the gutters, and the run-off, etc., to the canal. So that's what is going on here. My next step will be to actually get the 3" pipe (12 - 20' lengths) and to find the appropriate drain heads to install. Then, we'll be ready for the next big rain. As long as the canal stays lower than the pipe outfall.
Just Like Road Workers
Keeping Those Tools Upright