Pages

Showing posts with label Grouting. Show all posts

19 November, 2016

Gray Saturday Morning


Saturday, 19 November 2016, and another work day. Mr. Nelson's upset this morning. He likes to go downstairs (the basement) of the Mennonite house and snooze all day up in the top shelf of my storage area.

He can't do it today, as we're having Tulio (Arrest-A-Pest) come spray the Mennonite house inside, upstairs and downstairs. Nelson is just impossible to coax out from down in the basement, so it's a lot easier to keep him out in the first place.

There is some consolation however. In the new house, he's discovered his alternate hideaway. It's in the laundry/utility room off the kitchen. We keep the laundry basket up on a shelf by the window. He likes to sleep in the basket. That way he can keep an eye on the outside as well as the utility room and kitchen. Not as good as the basement, but it'll do.

Grouting the Tile
This morning, the grouting of the little tiles in the pool began. It's going fast too. Really makes the blue tiles spring to life.


The Top of the Waterfall
Not permanently in place yet, but the top of the waterfall will have pieces of stone tile covering it at an angle. The water will come between it and the vertical tiles.


Trial Run With A Hose
You can't really tell from the photo, but our first trial run of the waterfall was by hose, just to see if the water would cascade down the face of the waterfall. It did, and it looked and sounded very nice.

The successful test gives us the green light to go ahead with our ideas for the waterfall as they have been.


Pump Rigged For A Test
Bani rigged up the waterfall pump (a half-horse number) with flexible vinyl tubing to try it out by actually using the pump to provide the water for the falls.

After the pump was primed, water was drawn from a bucket and up and out at the waterfall head.


Cutting Concrete Casting Sprue
Theo is using a grinding tool to cut out casting sprue of concrete from where concrete oozed out during the casting process.


Bani Priming the Pump
I mentioned priming the pump, here Bani is doing just that. With luck, the next time we have to prime it, is if the pump needs to be taken out for repairs.


?? Cutting Slot in Waterfall Pipe
Theo is cutting a slit in the water pipe at the head of the waterfall. Mario is keeping a close eye on the proceedings.


Inspecting the Cut
Mario checking the cut. He came up with a good idea about having a small light over head, possibly attached to one of the beams, with its focus on the waterfall. Maybe have one with a multi-colored light that changes colors periodically.


Happiness. It Works!
Theo is very happy that the waterfall is working just the way that we thought and hoped it would.


Water Actually Cascading
You have to look closely, but there is water and it's cascading down the rocks just the way we thought and hoped it would.


Dianna and Mario Talking Waterfall
Dianna and Mario at the far end of the pool talking over the pool and the waterfall.


10 February, 2016

Pool House Expansion Project, Day 102 - 08/02/16

Vanity Cabinet, Toilet, Shower Tiling and Grouting, Vanity Mirrors and Clips, Granite

Day One Hundred Two, 08 February, 2016

It's getting very near the end, as they say. Remaining tasks are small but numerous, and some, although small, are time-consuming.

The Vanity medicine cabinet was hung accurately and where Dianna wanted it. As I was jockeying around to take a picture of it, I got to thinking, that it might just be a bit too high for her to look in the mirrors. Uh-oh.

After conferring with her, she said she hadn't even thought about that, and that yes, it was going to have to be lowered about another five inches or so. What're ya gonna do? Everybody makes mistakes.
Medicine Cabinet Hung
The toilet is in and hooked up, both to the flange as well as to the water supply. Unfortunately, the water isn't turned on yet, as we're waiting for the water heater fitting to be finalized. Another small task.
Painting Baseboard Behind Toilet
Last I looked, there was one square of floor tile for the shower yet to be installed. It sure is looking good and so is the slope toward the drain.
Shower Floor Almost Done
One of the things that happened was, when the medicine cabinet was laid on its back on the bed, most of the somewhat flexible, grey plastic clips holding the mirrors in place broke. They probably would have worked ok in an upright setting, but we had temporarily laid it on its back on the bed. The weight of the mirrors and the backing plywood for them was just too much for the clips to handle.

One of the mirrors had fallen out to the back of the cabinet. Nothing broke, but I noticed it was down, figured out what hapened, and took the other three down and put them aside to be dealt with later.

Each mirror needs to be glued to it's backing plywood, and something other than those grey clips was needed to hold the mirrors in place.

It took stops at three or four hardware stores (as usual here) before I found what I was looking for. Clear plastic rigid clips. I'm going to put two on the bottom of each mirror and one on each side and top. That should work great.
New Vanity Mirror Clips
Here's a picture of the screen door hooks and eyes I mentioned earlier. Not fancy, but they'll do the job till the shiny brass latches I ordered from the States, come in.
Screen Door Hooks 3-Inches Long
Ok. Now for the educational bit. What we all working on this project knew about working with granite you could put in a thimble. A five-minute conversation with Mr. Ernesto Matute (627-7685) taught us so much.

I'm so glad we didn't try to tackle this part of the project on our own. For starters, how we were selecting the piece of granite. We were thinking we would go look for a piece that didn't have any blemishes on the face, and that was about it.

Mr. Matute told us we needed to look on all the edges for smooth cuts, and very carefully, front and back for possible cracks or anything that even looked like it might be a crack.

He also told us that at Lano's, his guys do all the moving of the pieces. Let them assume liability on their site.

And the actual transporting. It had to be on edge, with a couple of guys in the back of the bed to hold it steady. Our plan had been to see about buying a thin piece of foam rubber, and then laying whatever granite we selectd, on that foam.

This elicited almost a howl of laughter from Mr. Matute. He told us, it had to be on edge on the long side, with the bonded edge up, and that it had to be placed on a piece of lumber at least as long as the piece of granite.
Bathroom Vanity Granite Slab
Finally, the third slab of granite proved to be the one that fit the bill for us to bring home. How, you might ask, did we bring it back to Casa Winjama?

Well, Omar selected a piece of straight lumber that was a bit more than eight-feet long, so that the stone could ride on edge, resting on the lumber in the bed of my Sport Trac (with the tailgate down), and at least two people holding onto the slab for the journey. Once we got it home, we unloaded it as rested it on edge against a coconut tree, as you see above.

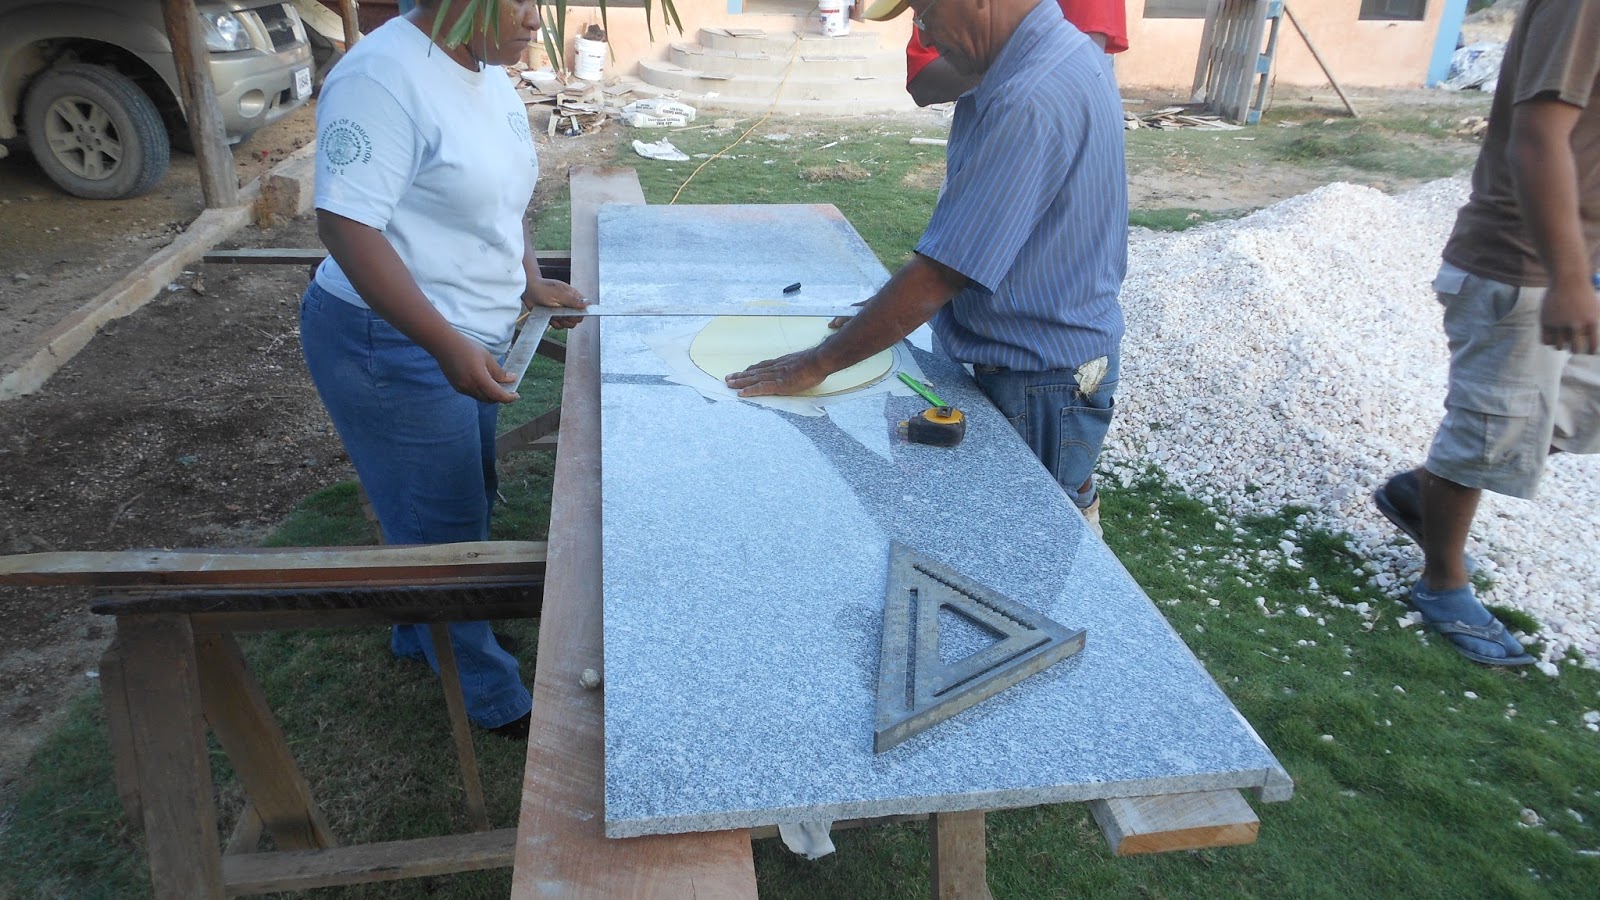
After that, Mr. Matute, ably assisted by his daughter, Stacy, got busy preparing to cut the granite. The task was compounded by the fact that the sink was an oval. Oval cuts are always tougher than straight cuts. Also, the oval of our sink, was just a hair out of true for an oval, which according to Mr. Matute, is not unusual. Each oval is slightly different than the next. Each is a challenge.
Matute Measuring Sink
In addition to the additional bracing that needed to be installed in the cabinet, we had to prepare a piece of half-inch furniture-grade plywood, to be a sub-layer for the granite.
Making Sure Plywood is Right Size
Here Mr. Matute, is cutting the plywood. This oval is slightly larger than the sink as the sink sits inside this oval, resting on two of the pieces of wood bracing that had been installed earlier. That way, the bracing actually supports the sink directly, as well as the granite.
Matute Cutting Sink Oval in Plywood
Under the vanity cabinet, we needed to have an electrical outlet for the Cat Genie litter box. The guys thought it would be easier to surface-mount an outlet, rather than cut a hole and fish the outlet itself throught the hole. Not a problem. That solution was fine for us. Why so many wires, you might ask? Well, again, I'll tell you. It's because a second outlet, above the vanity cabinet had been added and a wire was stubbed from this outlet to the new one. Two wires for each outlet and a twisted ground wire.
Outlet Wire for Cat Genie Under Vanity
Keeping in mind that there are several other tasks going on, here's a view of the grouting of the shower. It is really looking good.
Grout Underway in Shower
Mr. Matute is routing the bracing I mentioned, in preparation to setting the sink in the hole of the plywood. I asked Stacy if she was interested in running the business when her dad retired. She said emphatically, that yes, she was. Good for her.
Routing Sink Supports
Here's a shot under the counter of the cabinet, showing the piping run through the cabinet back as well as the sink itself.
Pipes Coming Through Vanity
As you can see, the sink fits snugly in the cut oval of the plywood.
Sink In Place With Plywood
As it turns out, the cardboard pattern of the oval, that Mr. Matute is cutting out here, really didn't fit the real oval we were dealing with.
Cutting Pattern From Sink Cardboard Box
They made another oval to fit the inner dimensions of the sink from heavy card stock.
Preparing Sink Inner Pattern
In order to cut the stone, Mr. Matute laid out center lines on the granite with a Sharpie, which erased off the polished surface with no problem.
Marking the Center Point
They then laid out the sink oval patterns for the cut.
Outlining the Pattern
They taped over the oval lines prepatory to cutting.
Checking the Layout
And then, using a small smooth diamond blade in his tool, Mr. Matute began the cutting process. This is a job that is best done outdoors, as it generates considerable dust.
Using Diamond Blade to Cut Sink Oval
This part of the process probably took slightly more than an hour for Mr. Matute to complete the cut. It's slow and steady work that results in a successful through cut.
Around And Around
Once he finished the cut, he laid the cut-out piece against the coconut tree and knocked off for the evening.

There's many more photos than appear in each posting. You can see all the photos of the construction project on Flickr at: https://www.flickr.com/gp/winjama/0wVc3s. There will be new photos added each day of the project. 

29 January, 2016

Pool House Expansion Project, Day 92-93 - 27-28/01/16

Plumbing, Ceiling Fans, Doggie Doors, Grouting, Drain Field, Roll-up

Day Ninety-Two and Ninety-Three, 27 - 28 January, 2016

Wednesday morning, I decided to get right to it and hook up the whole house filter (the little blue tank in the photo below) and the salt-free water softener (the big blue tank).
Stage One of Connected Piping to Filter
Of course, I periodically had to go on walk-about to see how other work and installations were coming along, like the office ceiling fan below. I love the antique look.
the Office Ceiling Fan
Mitch, the carpenter, had taken the rather plain Mennonite screen doors and did an outstanding job of modifying them to make the openings for our doggie doors. We still have the doggie doors installed upstairs in the Mennonite house.

Since we're still living there, it's a bit of a juggling act to determine just when we should move things like that down to the new house. It's partly a question of dealing with bugs, oh, and convenience, of course. Who wants to constantly be getting up to let three dogs and three cats (since they use the doggie doors as well) in or out virtually 24/7?
Doggie Door Opening in Screen Door
Here's Mr. Cobb, the electrician, assembling our new double-bladed fans. I saw these on the Lowe's website (where we bought all our fans). I've never seen anything like this double-bladed job. As soon as I saw it, I thought it would be cool to have. Each unit has smaller blades, about a foot long, I think, but the overall effect is like you have a ceiling fan with a seventy-five inch diameter, which would make for a huge fan.
Complicated Assembly
Of course, the grout work is progressing along. It really brings the tile to life and gives it a much more finished look.
Grout Being Applied
Here you can see it's been done down the entire length of the east walkway. It still needs final sponging.
Grout Going Whole Length
While all that is going on, Mitch, the carpenter is busy installing door jambs all around. Here, he and his assistant are installing the closet jambs.
Mitch the Carpenter and helper Mounting Closet Door Frame
Some of the hardest work currently, is digging the trenches for the septic drain-field. Marl is not the easiest stuff to dig through. It's basically the consistency of decaying concrete.
Digging Trenches for Septic Drain Field
Some time on Wednesday, the installers from Capital Factory showed up with the roll-up door. This was a nice surprise, as I wasn't expecting them till next week.
Rollup Door Minus Frame
Here's a nice example of the walkway tile after the grout has been applied and cleaned up. We opted to go with a 1/8th-inch grout line, and to use un-sanded grout. This give a much finer line, but also makes the tile look more unified. We love the way it's turning out.
Walkway Tiles With Chocolate Unsanded Grout
The guys from Capital Factory right away were stymied as far as being able to install the roll-up door. They said where we had the electrical wire coming out of the wall was in the wrong place. It would interfere with the roll-up frame. So, they left and were planning to return tomorrow morning, after we re-routed the wire, to complete their installation.
Wires For Roll-up Need to be Re-positioned
Sometime later in the afternoon, they returned. Seems in their zeal to install the door early, they grabbed the frame for another job up in Consejo. It was the wrong size for our job. That's why the roll-up was sitting on the floor in the photo above with no frame nearby. So, it's really a good thing that our wiring was in the wrong place.

In the photo below, you can see how I split the original incoming water line, so that now the incoming water is routed to the right-hand through-wall into the utility room and connects with the filter and softener. After leaving the softener, the water then comes back out via the left-hand through-wall, and then connects back with the piping going into the house.

I did this, because on the original construction, when the water pipe entered the house, it was routed under the concrete floor. Not knowing exactly where it went, meant either tearing up some of the floor to find it, or to simple route it like I did.
Outside Piping For House Water
You can see how the piping is run. It comes in via the left through-wall, diagonally up to the whole house filter, which also has a by-pass, so that water will still be able to flow when the filter is being changed. From there it runs up to the water softener, and then a run back to the right-hand through-wall. Simple, eh?
Piping For Whole house Filter and Softener
Here's how the connection with the water softener looks. Unfortunately, when I fired up the system (turned the water back on) there's a few leaks. And I had been so careful to glue things well and to ensure that leakage wouldn't happen. What are you gonna do?

Part of the issue seems to be a common problem here, in that PVC piping may be coming from one vendors, and the fittings from others. So, every now and then you find fittings that seem a tad loose when you glue and press them together. I had several fittings that seemed to be that way. I'll have to trouble-shoot it and see if I can get the leaks under control.
Piping For Softener
Something on fire? No, it's just Omar using his grinder to cut a notch in order to re-route the wiring for the roll-up door.
Dust Cloud From Omar Cutting Notch For Rollup
Another shot of the grouting. It seems that no matter which way you turn right now, somebody is grouting tile. It's getting hard to find a clear path anywhere.
Grouting East Walkway
Here's a glimpse of the re-routed wire for the roll-up, complete with an added junction box. Now we're ready.
Junction Box For Rollup
Mr. Cobb is busy assembling, wiring, and hanging the ceiling fans. We have three double-bladed fans - one in the living room, one in the bedroom, and one on the veranda for those days when there is simply no breeze at all. BTW, all the fans are indoor/outdoor rated.
Mr. Cobb Wiring Up Living Room Fan
Here it is in action. It stays stationary, but the twin blades make it seem like it wants to take off. It does move a significant amount of air, which down here, will be a Godsend.
Ready For Takeoff
Each of the blade assemblies is moveable. That is, each can be tilted some, to be aimed a bit other than just straight down.
Living Room Fan minus Cover
Now the Capital crew is back and jumped right in to installing the frame.
Snapping Chalk Line For Rollup Frame
They quickly drilled holes and mounted the heavy steel frame.
Rollup Frame Mounted
Almost immediately after that, the motor was fitted.
Mounting Rollup Motor
Since there were only the two of them, working with the roll-up was very awkward, due to its weight, they separated the roll-up into two parts, similar to the way you would separate a bicycle chain. Here, they're fitting half of the roll-up to the frame axle.
Working With Half of the Roll
They work the roll-up up and over the back side of the axle.
Ready to Fasten Roll to Axle
And, then fasten it to the axle with screws. Then they attach the other half of the roll-up and begin final adjustments so the thing works smoothly.

Fastening Roll t-Axle
After a couple of minutes, it does work smooth. They then attach the side tracks or guides that keep the roll-up close to the wall.
It's Working
From the inside of the living room, there's what it looks like unrolled.
From the Dining Room
The works of the assembly are now hidden behind a metal box-like cover, which they're installing now.
Mounting the Cover
There. It's all done. Of course now, Mr. Cobb has to re-route the control box to the inside of the living room, and the whole assembly will be painted to match the light tan of the walkway.
Installation All Done
While all that was going on, grouting continued unabated. Here Errol is using my ShopVac to prepare the dining room for its share of the grouting.
Vacuuming the Dining Room
There's many more photos than appear in each posting. You can see all the photos of the construction project on Flickr at: https://www.flickr.com/gp/winjama/0wVc3s. There will be new photos added each day of the project.