Pages

Showing posts with label Shower Tiling. Show all posts

10 February, 2016

Pool House Expansion Project, Day 102 - 08/02/16

Vanity Cabinet, Toilet, Shower Tiling and Grouting, Vanity Mirrors and Clips, Granite

Day One Hundred Two, 08 February, 2016

It's getting very near the end, as they say. Remaining tasks are small but numerous, and some, although small, are time-consuming.

The Vanity medicine cabinet was hung accurately and where Dianna wanted it. As I was jockeying around to take a picture of it, I got to thinking, that it might just be a bit too high for her to look in the mirrors. Uh-oh.

After conferring with her, she said she hadn't even thought about that, and that yes, it was going to have to be lowered about another five inches or so. What're ya gonna do? Everybody makes mistakes.
Medicine Cabinet Hung
The toilet is in and hooked up, both to the flange as well as to the water supply. Unfortunately, the water isn't turned on yet, as we're waiting for the water heater fitting to be finalized. Another small task.
Painting Baseboard Behind Toilet
Last I looked, there was one square of floor tile for the shower yet to be installed. It sure is looking good and so is the slope toward the drain.
Shower Floor Almost Done
One of the things that happened was, when the medicine cabinet was laid on its back on the bed, most of the somewhat flexible, grey plastic clips holding the mirrors in place broke. They probably would have worked ok in an upright setting, but we had temporarily laid it on its back on the bed. The weight of the mirrors and the backing plywood for them was just too much for the clips to handle.

One of the mirrors had fallen out to the back of the cabinet. Nothing broke, but I noticed it was down, figured out what hapened, and took the other three down and put them aside to be dealt with later.

Each mirror needs to be glued to it's backing plywood, and something other than those grey clips was needed to hold the mirrors in place.

It took stops at three or four hardware stores (as usual here) before I found what I was looking for. Clear plastic rigid clips. I'm going to put two on the bottom of each mirror and one on each side and top. That should work great.
New Vanity Mirror Clips
Here's a picture of the screen door hooks and eyes I mentioned earlier. Not fancy, but they'll do the job till the shiny brass latches I ordered from the States, come in.
Screen Door Hooks 3-Inches Long
Ok. Now for the educational bit. What we all working on this project knew about working with granite you could put in a thimble. A five-minute conversation with Mr. Ernesto Matute (627-7685) taught us so much.

I'm so glad we didn't try to tackle this part of the project on our own. For starters, how we were selecting the piece of granite. We were thinking we would go look for a piece that didn't have any blemishes on the face, and that was about it.

Mr. Matute told us we needed to look on all the edges for smooth cuts, and very carefully, front and back for possible cracks or anything that even looked like it might be a crack.

He also told us that at Lano's, his guys do all the moving of the pieces. Let them assume liability on their site.

And the actual transporting. It had to be on edge, with a couple of guys in the back of the bed to hold it steady. Our plan had been to see about buying a thin piece of foam rubber, and then laying whatever granite we selectd, on that foam.

This elicited almost a howl of laughter from Mr. Matute. He told us, it had to be on edge on the long side, with the bonded edge up, and that it had to be placed on a piece of lumber at least as long as the piece of granite.
Bathroom Vanity Granite Slab
Finally, the third slab of granite proved to be the one that fit the bill for us to bring home. How, you might ask, did we bring it back to Casa Winjama?

Well, Omar selected a piece of straight lumber that was a bit more than eight-feet long, so that the stone could ride on edge, resting on the lumber in the bed of my Sport Trac (with the tailgate down), and at least two people holding onto the slab for the journey. Once we got it home, we unloaded it as rested it on edge against a coconut tree, as you see above.

After that, Mr. Matute, ably assisted by his daughter, Stacy, got busy preparing to cut the granite. The task was compounded by the fact that the sink was an oval. Oval cuts are always tougher than straight cuts. Also, the oval of our sink, was just a hair out of true for an oval, which according to Mr. Matute, is not unusual. Each oval is slightly different than the next. Each is a challenge.
Matute Measuring Sink
In addition to the additional bracing that needed to be installed in the cabinet, we had to prepare a piece of half-inch furniture-grade plywood, to be a sub-layer for the granite.
Making Sure Plywood is Right Size
Here Mr. Matute, is cutting the plywood. This oval is slightly larger than the sink as the sink sits inside this oval, resting on two of the pieces of wood bracing that had been installed earlier. That way, the bracing actually supports the sink directly, as well as the granite.
Matute Cutting Sink Oval in Plywood
Under the vanity cabinet, we needed to have an electrical outlet for the Cat Genie litter box. The guys thought it would be easier to surface-mount an outlet, rather than cut a hole and fish the outlet itself throught the hole. Not a problem. That solution was fine for us. Why so many wires, you might ask? Well, again, I'll tell you. It's because a second outlet, above the vanity cabinet had been added and a wire was stubbed from this outlet to the new one. Two wires for each outlet and a twisted ground wire.
Outlet Wire for Cat Genie Under Vanity
Keeping in mind that there are several other tasks going on, here's a view of the grouting of the shower. It is really looking good.
Grout Underway in Shower
Mr. Matute is routing the bracing I mentioned, in preparation to setting the sink in the hole of the plywood. I asked Stacy if she was interested in running the business when her dad retired. She said emphatically, that yes, she was. Good for her.
Routing Sink Supports
Here's a shot under the counter of the cabinet, showing the piping run through the cabinet back as well as the sink itself.
Pipes Coming Through Vanity
As you can see, the sink fits snugly in the cut oval of the plywood.
Sink In Place With Plywood
As it turns out, the cardboard pattern of the oval, that Mr. Matute is cutting out here, really didn't fit the real oval we were dealing with.
Cutting Pattern From Sink Cardboard Box
They made another oval to fit the inner dimensions of the sink from heavy card stock.
Preparing Sink Inner Pattern
In order to cut the stone, Mr. Matute laid out center lines on the granite with a Sharpie, which erased off the polished surface with no problem.
Marking the Center Point
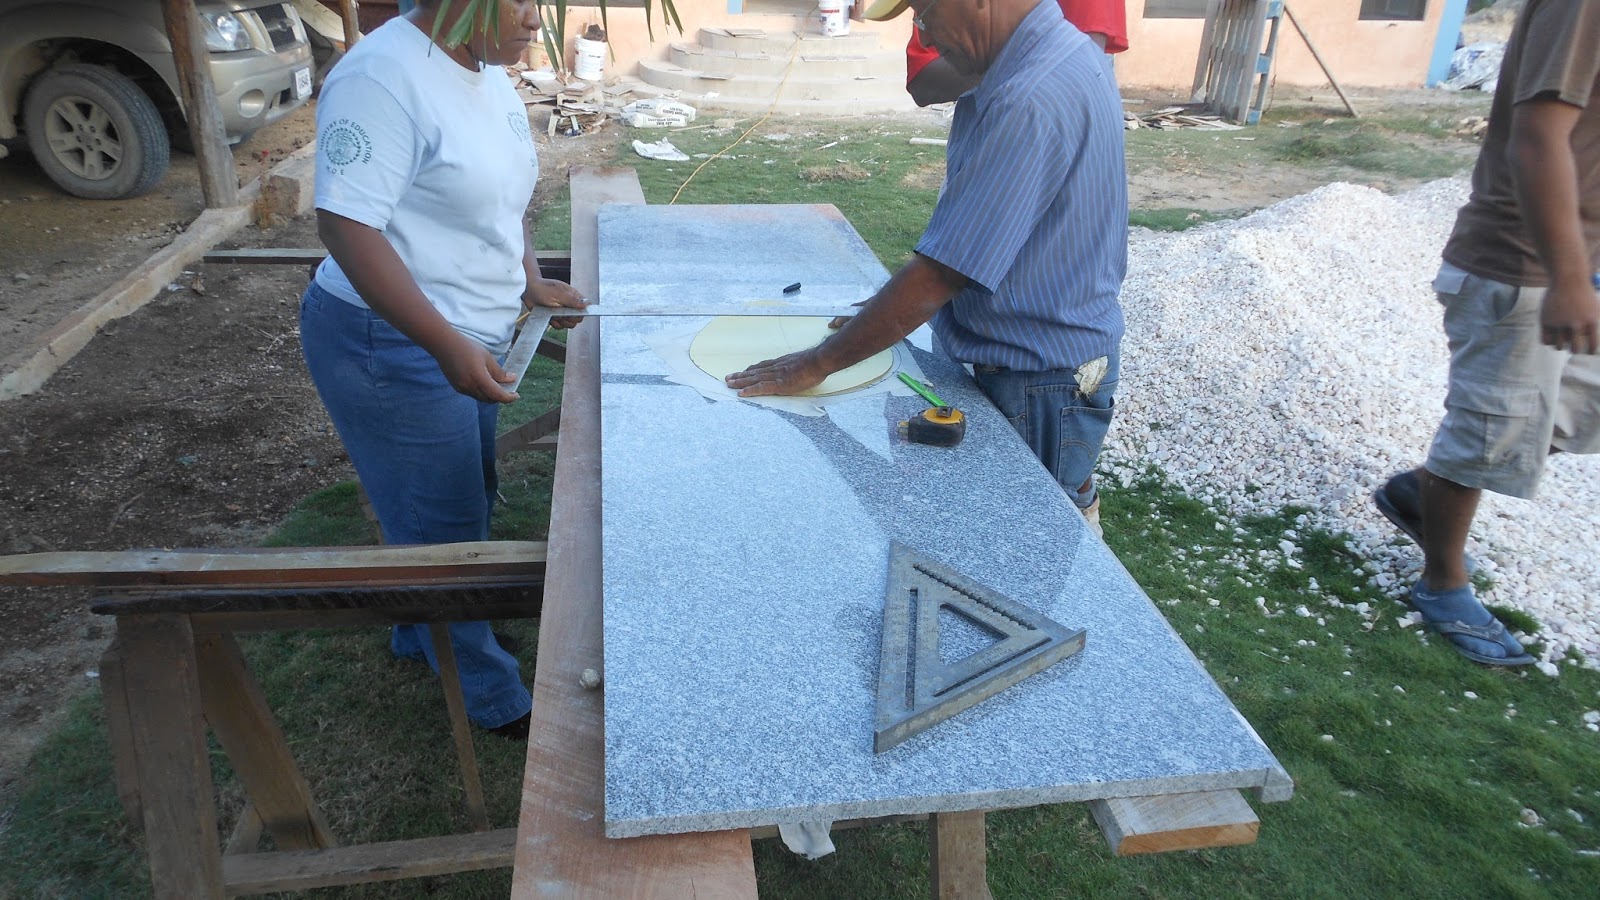
They then laid out the sink oval patterns for the cut.
Outlining the Pattern
They taped over the oval lines prepatory to cutting.
Checking the Layout
And then, using a small smooth diamond blade in his tool, Mr. Matute began the cutting process. This is a job that is best done outdoors, as it generates considerable dust.
Using Diamond Blade to Cut Sink Oval
This part of the process probably took slightly more than an hour for Mr. Matute to complete the cut. It's slow and steady work that results in a successful through cut.
Around And Around
Once he finished the cut, he laid the cut-out piece against the coconut tree and knocked off for the evening.

There's many more photos than appear in each posting. You can see all the photos of the construction project on Flickr at: https://www.flickr.com/gp/winjama/0wVc3s. There will be new photos added each day of the project. 

Pool House Expansion Project, Day 101 - 06/02/16

Vanity Cabinet and Plumbing, Attic Access, Shower Tiling, Temporary Screening,

Day One Hundred One, 05 February, 2016

Sunday, Dianna and I put together a list of items we noticed that still needed to be done or corrected, so a lot of the next few posts will be focused on those sorts of items.

The vanity cabinet with additional bracing, is in place.
Vanity With Additional Bracing For Granite
The attic access hatch has been spruced up, drywalled, textured, painted, an actual cover for a hatch, that sort of thing. It's really hard from the photo below, just what you're looking at. Trust me, it's the attic access, looking up through the upper closet shelf from the floor. That orange thing is a ladder.
Attic Opening Getting Finished
 The piping had holes accurately cut and the cabinet is now positioned properly in it's final location.
Piping Through and Clear
 Omar has been able to get a good start on tiling the shower floor.
Shower Floor Tile Started
He has been very careful to maintain a slope towards the drain. Here, he's double-checking the slope.
Making Sure the Slope Is Right
We've finally got the temporary screen in place. Eventually, a screen door will go there. On the other side, will be a landing slab holding a circular metal staircase going up to the flat deck that we will use as an observation deck. It will also provide easy access to check the roof and gutters, and for me to work on the weather station, which right now isn't working, but I have high hopes to get that back on track.
Installing A Temporary Screen
There's many more photos than appear in each posting. You can see all the photos of the construction project on Flickr at: https://www.flickr.com/gp/winjama/0wVc3s. There will be new photos added each day of the project.

Pool House Expansion Project, Day 100 - 05/02/16

Corozal Virtual Office, Mr. Matute Granite Cutter, Bathroom Vanity, Shower Tiling, Cable,

Day One Hundred, 05 February, 2016

Writing about this project gets crazy once in a while. Sometimes because several things happen simultaneously, and other times, external things happen. For example, when your computer goes south for the umpteenth time. I swear, my computer spends more time with Fred Orio, at Corozal Virtual Office, than it does here.

Shortly after I posted the photo of the iguana walking up the vacant lot next door, my hard drive directory went haywire. So, the PC went back to Fred's place. I just picked it up yesterday, the 9th of February.

You'll notice the date of this posting is for the 5th. So, I'll be playing catch-up while also trying to stay more or less current as the project heads into it's final days.

Mr. Matute, the granite cutter (627-7685),  came by to have a look-see at the project and where we wanted the granite to go, which was on the top of the bathroom vanity cabinet.

The first thing he told us was that the cabinet by itself was nowhere near strong enough to support the granite. We would have to add additional support. The photo below is the result of the additional support being added.

We're also in the process of getting the vanity cabinet positioned in the bathroom.
Vanity Made It To Bathroom
Which means that some holes had to be cut in the back of the cabinet to allow the supply and drain pipes to enter into the cabinet.
Pipes Waiting For Holes In Vanity
We also had to rummage through piles of stuff in the kitchen and bathroom to find the bathroom sink and faucet. Here's the sink, upside down, and still in one piece.
Bathroom Sink
While all that has been going on, Omar had been busy trying to finish tiling the shower. Which is tough, since he's basically the foreman for the whole operation. As a result, he gets pulled away quite often to solve problems and give direction. All part of being a leader.
Tiling the Shower
Valerio Cobb, the electrician (624-3307), has been in and out for a couple of weeks now. He's easy to work with and is quite knowledgeable He just got the cable wiring done. Of course, right now we have no cable... We do have high hopes of getting cable service some day.

Anyway, the cable is run from the living room up to the attic and over to the outside south wall, where it will be attached to the satellite dish for now.
Cable Cable
There's many more photos than appear in each posting. You can see all the photos of the construction project on Flickr at: https://www.flickr.com/gp/winjama/0wVc3s. There will be new photos added each day of the project.

31 January, 2016

Pool House Expansion Project, Day 94-95 - 28-30/01/16

Septic System, Lighting, Doors, Bed, Tiling, Cabinets, Baseboards, Trash,

Day Ninety-Four and Ninety-Five, 28-30 January, 2016

Thursday seemed like a slow day, although there was a lot of progress. I don't know how to describe it, really. And that continued through Friday. In fact, I actually took no photos on Friday. Thursday's work just continued.

I guess maybe because revisiting the septic system after all this time. Here's the drain field finally being put to rest, so to speak. Trenches all dug and perforated pipe being put in off of the manifold. All the perforated pipe will be covered with fabric to help prevent marl infiltrating and clogging the perforated pipe in the drain field.
Drain Field Manifold
 This is a bit of a larger view of the drain field. It will be gravel lined, the pipes put in with fabric, and covered with more gravel, then covered with marl.
At Work on the Trenches
The septic piping as it leaves the house. The left side is gray water from the laundry room and bathroom and routes directly to the drain field. The right side is from the toilet and goes to the Rotoplas.
Drain Field As It Leaves House
Saturday's work started anew with enough differences that I fired up the trusty Nikon.

Speaking of the Rotoplas, here's its final set-up. On the left is the large access hatch to the Rotoplas itself. In the middle is a very small white cap. That's hose access to flush out the Rotoplas when needed. To the right is a drum with lid containing the valve and where the pooper pumper will recover the stuff as it's flushed out by the hose. Something to look forward to, I'm sure.
Septic Tank and Fittings
On a lighter note, here's our seven-light Vanity light, newly installed with three bulbs just to show it works.
Bathroom Vanity Light Installed
And our closet doors. For some reason, that makes the room look really tropical to me.
Closet Doors Installed
And the bed that used to live in the room that is now the pantry, laundry, freezer, fridge, and storage room. It looked big in there, but now in the new bedroom, it looks kinda small. It is a queen size. It'll be an experience sleeping on it again after our double bed in the Mennonite house. This is also the bed I slept on for a month when I injured my back falling on the curb a year or so ago.
Bed Finally In the Bedroom
We have screen doors. They've turned out quite nice. All we need now is latches and some sort of spring return for them - oh, and the doggie doors from upstairs, of course.
Front Screen Door
Here's the front screen door from outside. Looks nice.
Front Screen Door From the Outside
Mr. Cobb, the electrician installing porch lights. This one's a little strange right now. This doorway goes nowhere. That's because, eventually, there'll be a new pad built/poured for a circular stairway up to the flat roof part of the house. That will be our observation deck, and my easy access to the weather station that I hope to resurect one of these days.
Mr. Cobb Hanging Porch Lights
Our closet now officially has light.

Closet Has A Light
And the shower is getting tiled. Omar does good work with the tile. He's looking forward to adding the bling tile for Dianna.
Omar Tiling the Shower
Our bathroom vanity medicine cabinet is resting for the moment on the bed. It takes up the full width of the bathroom.
Vanity Cabinet Resting
Now we're talking. Here's the vanity lights with all seven lit up with LED lights. They only take four Watts each. So, in total, they don't consume as much current as a forty-watt bulb.
Vanity Light All Lit Up
Our back screen door is a clone of the front screen door. It too doesn't have a latch or spring return mechanism... yet.
Back Screen Door
Our erstwhile carpenters are busy installing the wood baseboards all around the inside area of the house. There won't be any baseboard in the walkway or veranda.
Fitting Baseboards

But, right now, there is trash in the walkway, and lots of it. I think a dump run must be in the offing soon.
Lots of Trash
Here's the septic fittings all done and outfitted with the sewer gas flapper valves.
Exterior Drains to Septic System and Drain Field
And once again, an overview of the septic system and the drainfield. It'll look quite nice when we've got plants growing.
Septic System The Big Picture
There's many more photos than appear in each posting. You can see all the photos of the construction project on Flickr at: https://www.flickr.com/gp/winjama/0wVc3s. There will be new photos added each day of the project.